Hi, we are starting to use different technologies to build complex scenarios around APIs. It’s getting common to use popular NoSQL DBs like MongoDB.
For this reason, I decided to build this very easy to follow blog that will help you get started with MongoDB and build simple REST APIs using NodeJS via the Express module.
The use case is simple, we are going to build a MongoDB to store users information that eventually (in a future blog) we are going to use to send SMS and Voice call notifications… But for now we are keeping things simple, we are starting by demystifying the use of MongoDB with NodeJS.
The code that sends the SMS/Voice call notifications in NodeJS via Twilio is out of the scope of this blog, but if you want to use it, you can find it here.
Pre-requisites
This blog is about simplicity, so we are going to build a simple HelloWorld sample that starts from scratch and interacts (GET and POST) with a MongoDB via Express APIs.
Installing and playing with MongoDB
In this section, I am going to show you how to install and get your MongoDB up and running. This is going to be the DB that we are going to use in a future blog to send SMS and voice call notifications to people.
Note: I am using Ubuntu, adjust if using other OS (e.g. yum if using OEL/RH):
sudo apt-get install mongodb
- Validate the installation by running mongo client – This should connect to the running MongoDB Server


-
The database doesn’t really exist until we add some data. The best thing of MongoDB is that you store JSON payloads into it. This makes it very friendly when interacting with APIs.
In our case, we want to build a notification service and we want to store the contact details of the recipients. Something like:
{“name”:”Carlos”, “mobile”:”+615550505″, “msg”:”Hello World”}
Note that we are not defining ids, mongoDB will take care of it.
-
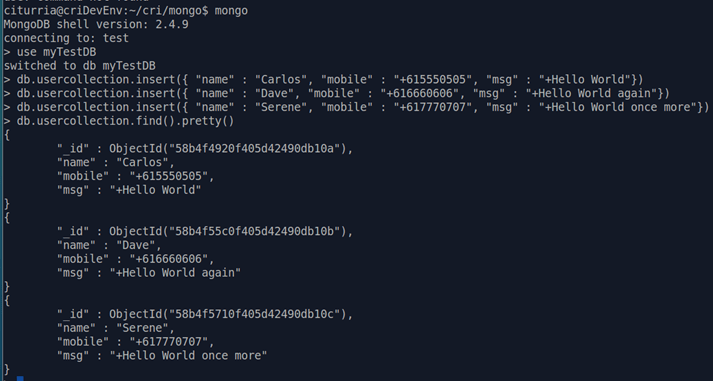
Still within the mongo client db type the following inserts each followed by ab enter:
db.usercollection.insert({ “name” : “Carlos”, “mobile” : “+615550505”, “msg” : “+Hello World”})
db.usercollection.insert({ “name” : “Dave”, “mobile” : “+616660606”, “msg” : “+Hello World again”})
db.usercollection.insert({ “name” : “Serene”, “mobile” : “+617770707”, “msg” : “+Hello World once more”})
-
Now, simply retrieve the inserted collection
db.usercollection.find().pretty()
-
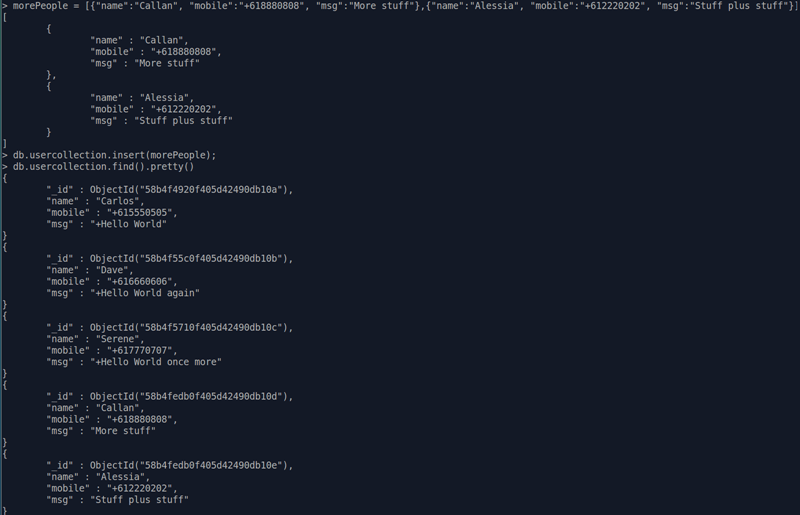
You can also add a JSON array of JSON payloads, so that you can insert a bulk of entries to MongoDB. For example:
users = [{“name”:”Callan”, “mobile”:”+618880808″, “msg”:”More stuff”},{“name”:”Alessia”, “mobile”:”+612220202″, “msg”:”Stuff plus stuff”}]
db.usercollection.insert(users);
-
Once again, retrieve the inserted collection:
db.usercollection.find().pretty()
-
You can also use the usercollection object to remove individual entries by _id:
db.usercollection.remove( {“_id”: ObjectId(“ID_GOES_HERE”)});
-
To completely clean up all your entries, you can simply use:
db.usercollection.remove()
-
If you only want to use mong client to switch to a MongoDB and print a specific collection you can do this:
-
To list all Collections in current db:
db.getCollectionNames()
-
If you are using a MongoDB that requires authentication, you might need to create a specific user(s) under specific databases. For this follow the next steps:
-
Using mongo client, login to admin db as administrator:
mongo admin –username root –password [GIVEN_PASSWORD]
Note: If using Bitnami, [GIVEN_PASSWORD] is the same as the OS root password.
-
Switch to your MongoDB database:
use [DATABASE]
-
Create a new user(s)
db.createUser(
{
user: “USER-GOES-HERE”,
pwd: “PASSWORD-GOES-HERE”,
roles: [ “readWrite”, “dbAdmin” ]
}
)
Note: Substitute USER-GOES-HERE and PASSWORD-GOES-HERE with your own values.
-
That’s it, you can now use that username and password to authenticate and grant read and write access to your db. If using monk in NodeJS as shown below in this blog, make sure to add the credentials in the connection string. A simple way to achieve this is by adding “USER:PASSWD@” before the server name.
For example:
var db = monk(USER + ‘:’ + PASSWD + ‘@’ + MONGODB_SERVER + ‘:’ + MONGODB_PORT + ‘/’ + DB_NAME);
For more information: https://docs.mongodb.com/manual/reference/mongo-shell/
Ok, our MongoDB is behaving well. Let’s run it together with our Express NodeJS code.
Building a simple Express JS API that interacts with a MongoDB
Now that we have a running MongoDB server running, let’s build a simple NodeJS code that will expose simple Express REST APIs to interact with your MongoDB.
I am going to explain below those snippets that require explanation, however before continuing make sure that you have downloaded/cloned the NodeJS project found here: https://github.com/barackd222/s2v-iia-nodejs-mongodb-crud-demo
The bits that you need to pay special attention from the NodeJS code:
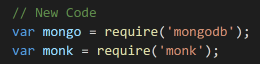
- Monk is going to give you the ability to connect to a MongoDB running somewhere. Think of it as a JDBC connection, in the relational database world, if you like.

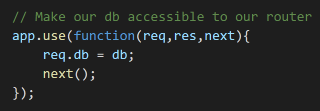
- Configuring the Express app to add the Monk db as part of it, so that it can be accessed within the request variable in each REST API.
- The rest is just adding the right headers for the requests and starting the listening service.
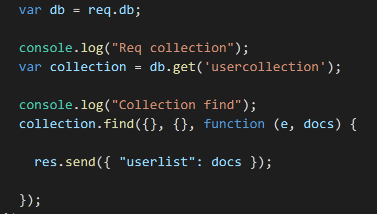

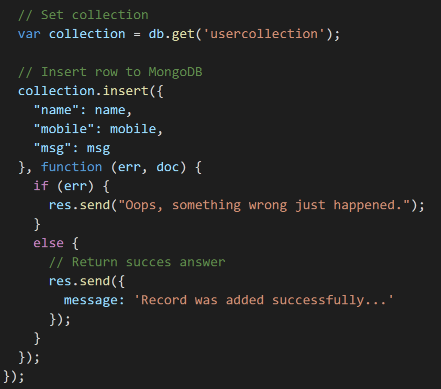
- Builds the Collection object as we did in the MongoDB console before
- Uses the collection to insert the new user in a JSON format
- Then it just handles errors if any. Otherwise return a successful response
Let’s test our NodeJS Application
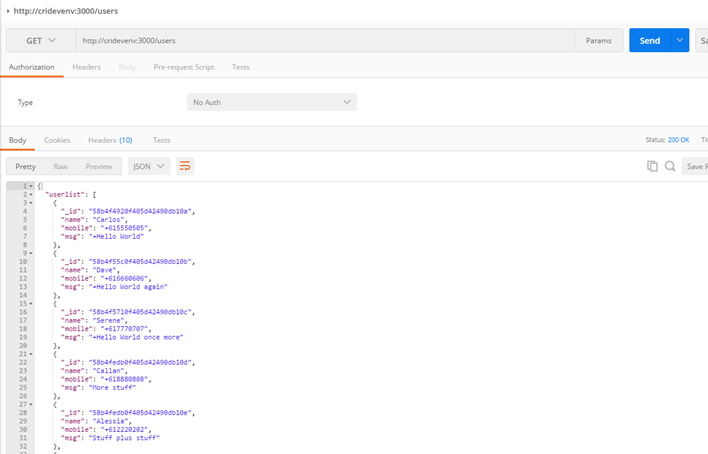
If you have been following this blog, at this point you have a few users in your “myTestDB” MongoDB, that you enter via the mongo client command line earlier.
- I am using Postman to call the APIs, you can use your preferred test REST client. Let’s first try to retrieve these users.
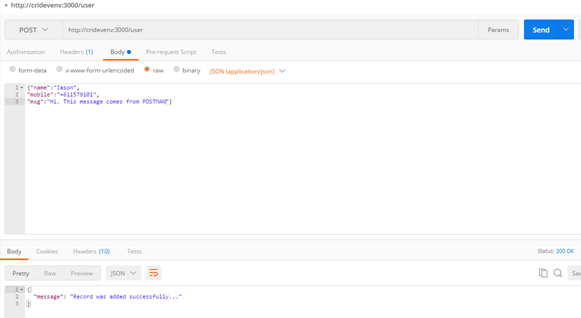
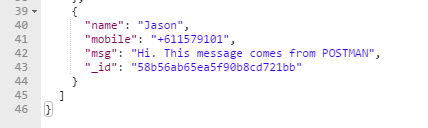
- Great job, now invoke your POST API to create a new one. In my case this is the JSON that I am sending:
{“name”:”Jason”,
“mobile”:”+6115791010101″,
“msg”:”Hi. This message comes from POSTMAN “}
Note: Make sure to add your header Content-type set to application/json
- Now call the GET
/users API again and make sure your new user is retrieved
Congratulations, you just managed to do very basic, yet powerful tasks using MongoDB as the backstore and NodeJS to expose interactive REST APIs via Express JS
If you have any comment, feel free to contact any of the authors of solutionsanz.blog – We are here to help you!
Thanks,

