
Over the past few years, in everything from personal photo storage to enterprise development there has been an incredible uptake of cloud storage buckets which provide a simple, low-cost mechanism for storing unstructured data. For much longer than that, there has been a need to consume, stage and produce unstructured data in enterprise integration scenarios. File servers accessible via protocols such as FTP/SFTP, etc. are commonly used to meet the staging requirements of traditional file-based integration use cases.
The practice of using an FTP/SFTP server alongside Oracle’s cloud integration platform – Oracle Integration Cloud (henceforth, OIC), is nothing new and is well documented.
In a series of upcoming blogs, I will explore how we can use Oracle’s cloud storage buckets (Oracle Cloud Infrastructure – Object Storage) instead of a traditional FTP server in cloud-based integrations. In this initial blog I will focus on:
- Connecting to Object Storage with Oracle Integration Cloud
- Writing Files to Object Storage with Oracle Integration Cloud
- Enforcing an archival policy for files at rest
In this series of posts, I will show how OIC can be used to perform all of the common activities against Object Storage buckets that might be useful for your integrations:
- Write objects
- Read objects
- List objects
- Delete objects
- Move objects
For those of you who are not familiar with Oracle Cloud Infrastructure (OCI) Object Storage, you can get a high level overview here, and a similar overview of OIC can be found here.
Prerequisites for establishing a connection to OCI Object Storage
Before you can connect to OCI Object Storage to perform operations such as read or write with Oracle Integration Cloud, you need to set up an Object Storage Bucket, and configure API keys to access it.
Creating an Object Storage Bucket
Creating a bucket is a trivial process via the Oracle Cloud UI console as the only input you need to provide is a meaningful bucket name and a selection of an appropriate storage tier:

At this point, I do think it’s important to get a little bit of Object Storage terminology out of the way to make sure that we are all on the same page going forward:
OBJECT: Any type of data, regardless of content type, is stored as an object. The object is composed of the object itself and metadata about the object. Each object is stored in a bucket. For our use case we can think of objects as files.
BUCKET: A logical container for storing one or more objects.
NAMESPACE: A logical entity that serves as a top-level container for all buckets and objects, allowing you to control bucket naming within your tenancy. Each Oracle Cloud Infrastructure tenant is assigned one unique and un-editable Object Storage namespace that spans all compartments within a region.
Configuring API Keys for OCI
In order to interact with Object Storage from OIC, the REST API will be used. In order to authenticate to the OCI APIs, an API signing key pair needs to be generated for the OIC user. These instructions use OpenSSL, though there are several mechanism to do this.
Note: It is good practice to create a dedicated service account for this, since that will make policy management and governance easier. For demoing and testing, you can just use your normal OCI user account though. Details on creating a user and setting appropriate policies for that user to create and use object storage buckets are available here.
- If you have not already generated an API key for your OCI user, you can do so with the below commands:
openssl genrsa -out ~/oci_api_key/oci_api_key.pem  2048

chmod go-rwx ~/oci_api_key/oci_api_key.pem

openssl rsa -pubout -in ~/oci_api_key/oci_api_key.pem -out ~/oci_api_key/oci_api_key_public.pem
Note: the key pair must be in PEM format
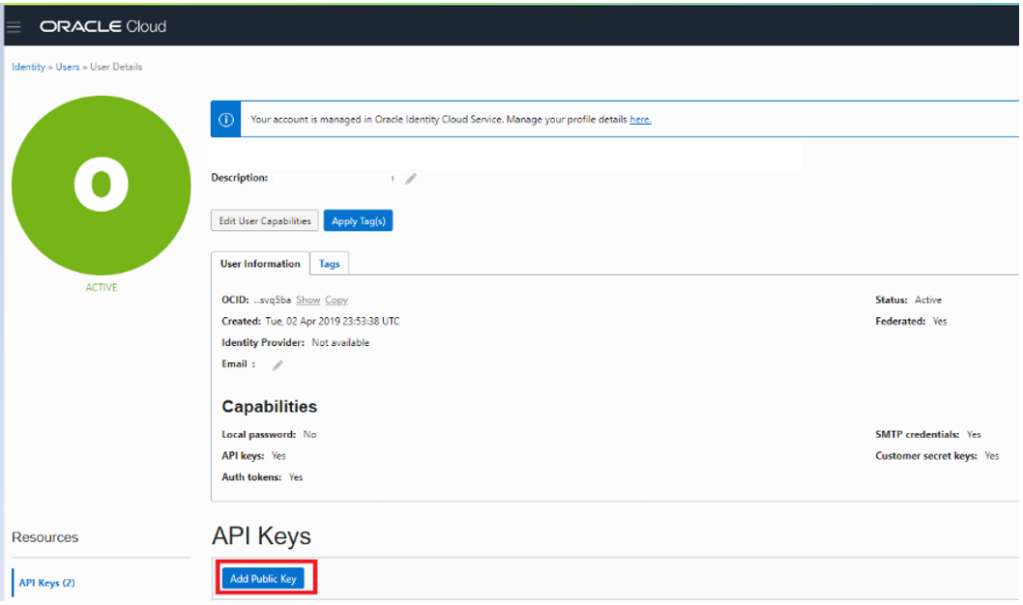
- Once you have generated the key pair, you need to upload the public key to the OCI Console. You can do this from the User menu by selecting the API Keys > Add Public Key Option:
Establish an OIC Connection to Object Storage
Oracle Object Storage supports the following access methods:
- HTTP / Browser
- Command Line Interface (CLI)
- REST API
- Oracle Cloud Infrastructure SDK
As previously mentioned, in this blog I will be demonstrating how to set up the integration using the REST API to access Object Storage via OIC. You can find the OCI Object Storage REST API reference documentation here.
As can be seen from the above link, you can perform a host of actions via the REST API from creating buckets, to managing objects, to creating life-cycle policies. Typically your integrations will care about files (objects) and so I will focus on the following Object Storage API operations:
- CopyObject
- DeleteObject
- GetObject
- HeadObject
- ListObjects
- PutObject
- RenameObject
- RestoreObjects
Armed with the above API reference documentation and OCI setup, we can now create our connection in Oracle Integration Cloud.
- Navigate to the connection section of your OIC instance and create a REST adapter connection with the following settings:
- Connection Properties:
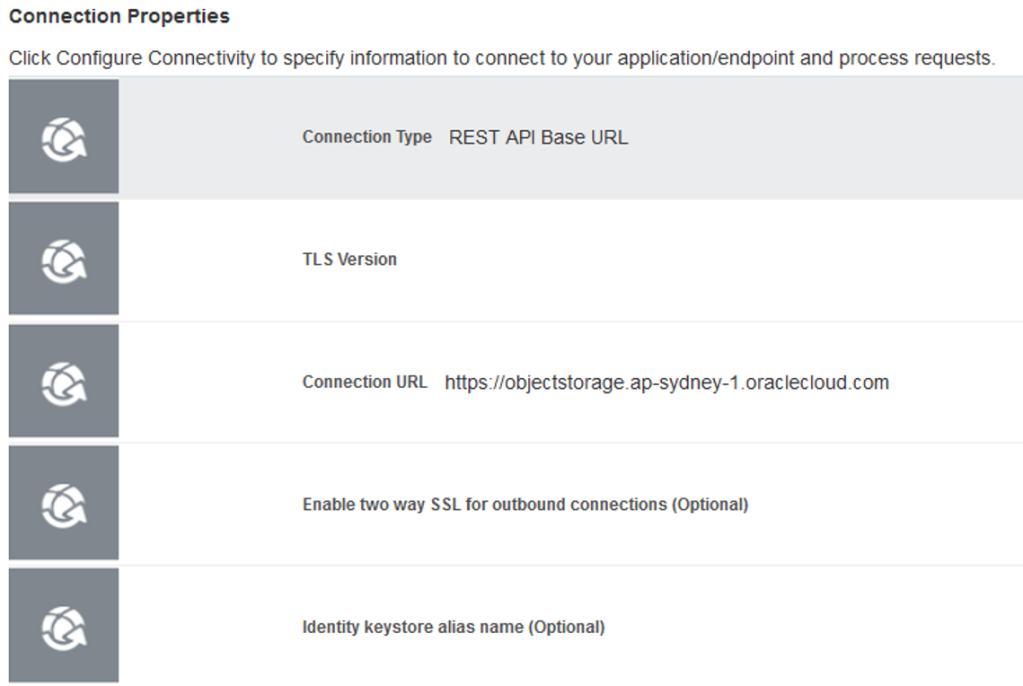
| Connection Type: | REST API Based URL |
| Connection URL: | Select an object storage endpoint that matches your object storage location from the list provided here. In my case this is https://objectstorage.ap-sydney-1.oraclecloud.com |
2. Security:
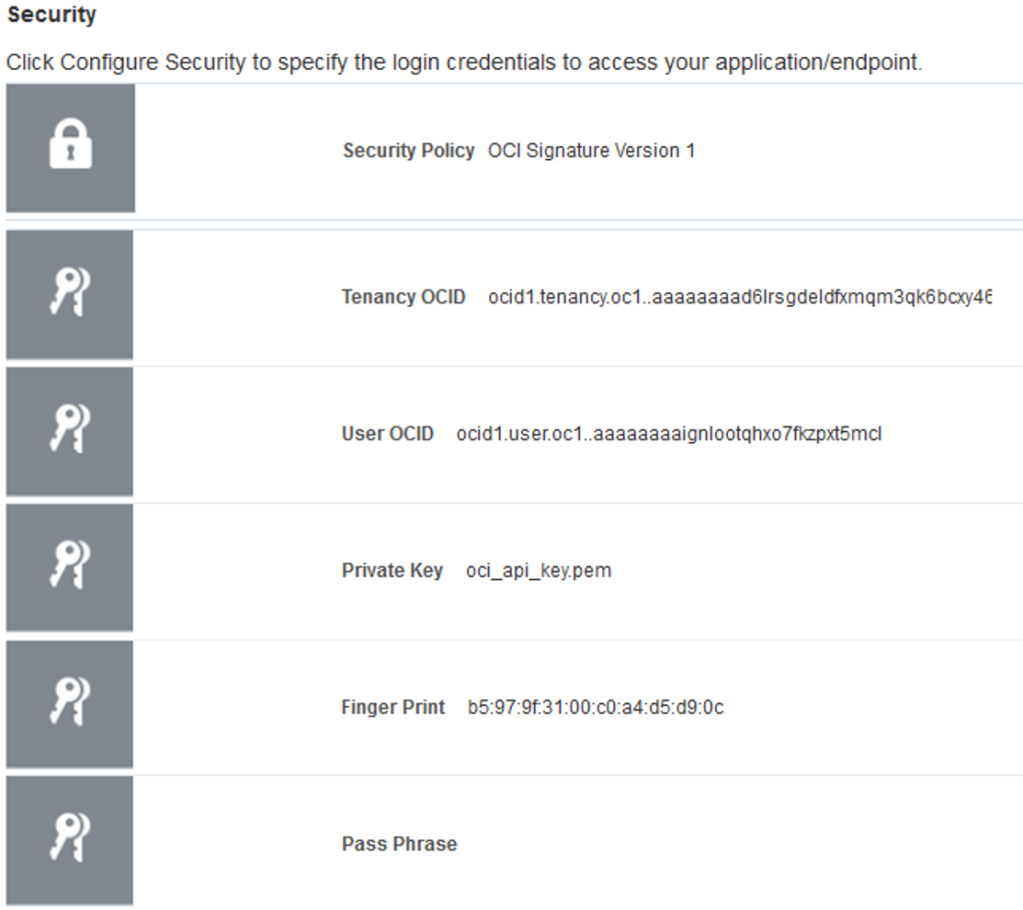
| Security Policy: | OCI Signature Version 1 |
| Tenancy OCID: | You can find your tenancy OCID in Oracle Cloud Infrastructure by navigating to Administration from the main menu, and selecting Tenancy Details. You will find your OCID in the Tenancy Information screen. |
| User OCID: | I would recommend creating a dedicated user for Oracle Integration Cloud here. This would ensure separation of duties and isolation between personal and system accounts. Once your user has been created you can retrieve the user OCID by navigating to Identity from the main menu in OCI and selecting Users. Select your OIC user account and retrieve the corresponding OCID. |
| Private Key: | Add the private key from your key pair that corresponds to the public key that you uploaded for your user in Oracle Cloud Infrastructure. Again this should be in .pem format. |
| Finger Print: | Copy the Fingerprint generated in Oracle Cloud Infrastructure for your uploaded key and paste it into your OIC connection here. You can find the fingerprint under Identity > Users > API Keys. |
| Pass Phrase: | If you have created a passphrase during the pem key generation than enter the passphrase here in the OIC connection. |
Test and save your connection in Oracle Integration Cloud:

Write Files to Object Storage with OIC:
To write files to OCI Object Storage we need to leverage the Object Storage > PutObject API endpoint. You can find the specific resource documented here.
Please note that this API will upload the entire file to Object Storage in a single operation. For files over 100MiB Oracle recommends the use of multipart upload. Multipart Upload is a feature that can be used to upload files of up to 10TiB by chunking them down into smaller parts that can be uploaded in parallel. For more information on this feature please see here.
Using the PutObject API we can create a new object or overwrite an existing object with the same name in an Object Store bucket. To demonstrate this I have created two different integrations that hopefully show the various ways which OIC can be used to create files in Object Storage.
Write Integration 1:
Use OIC to upload files to Object Storage by passing a file (as a binary stream) to an OIC integration. This just creates a wrapper service, but it effectively demonstrates the invocation of the OCI Object Storage API and allows us to quickly test our newly created connection:

Here I have used a REST trigger connection to allow me to trigger an OIC flow as a REST Service.
I have defined my endpoint URI with a template parameter. This parameter will store the name of the object that will be uploaded in OCI.
The operation is defined as POST and I have chosen to configure a request and a response for this endpoint.

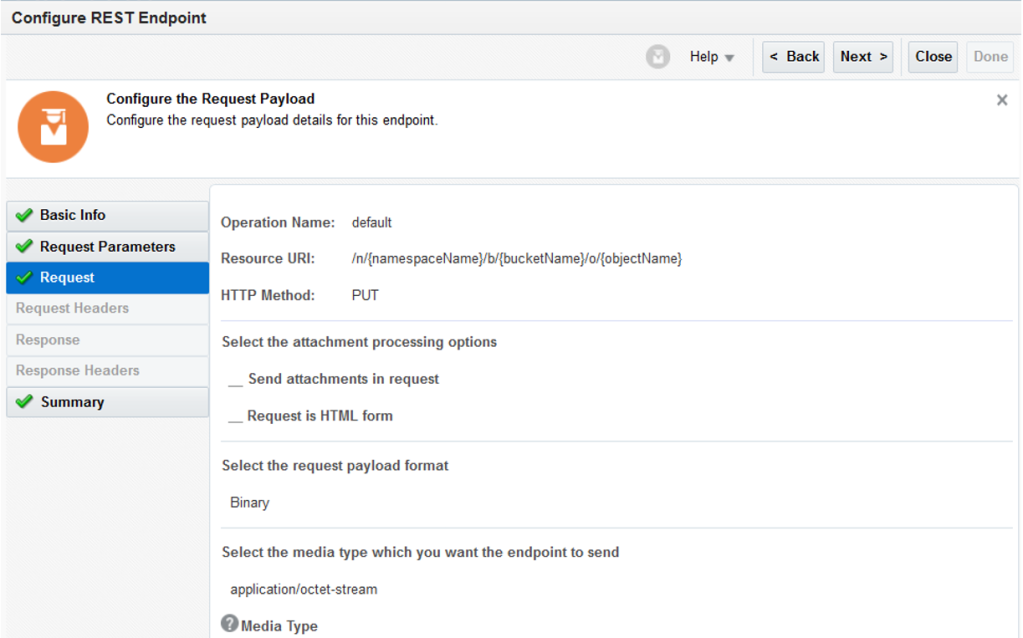
In the Request I have configured the endpoint to accept a binary stream of data and set the media type to application/octet-stream:

In the response I have defined a sample JSON schema that would return the object name and an associated status:
{
  "objectName": "myObjectName",
  "Status": "SUCCESS",
  "ErrorDetail": {
    "ErrorCode": "Some Error Code",
    "ErrorMessage": "Some Error Message"
  }
}
I then dragged the OBJECT STORAGE REST connection on to the canvas and this auto generated the mapper component.
In the mapper component I have mapped stream reference from the REST trigger to the stream reference in the OBJECT STORAGE REST connection. This ensures that the file is passed as expected.
The OCI object storage API uses several template parameters and here I have mapped them as follows:
- NamespaceName: sourced from a lookup in OIC, as value will be static
- BucketName: sourced from a lookup in OIC, as value will be static
- ObjectName: Passed from template parameter in originating request

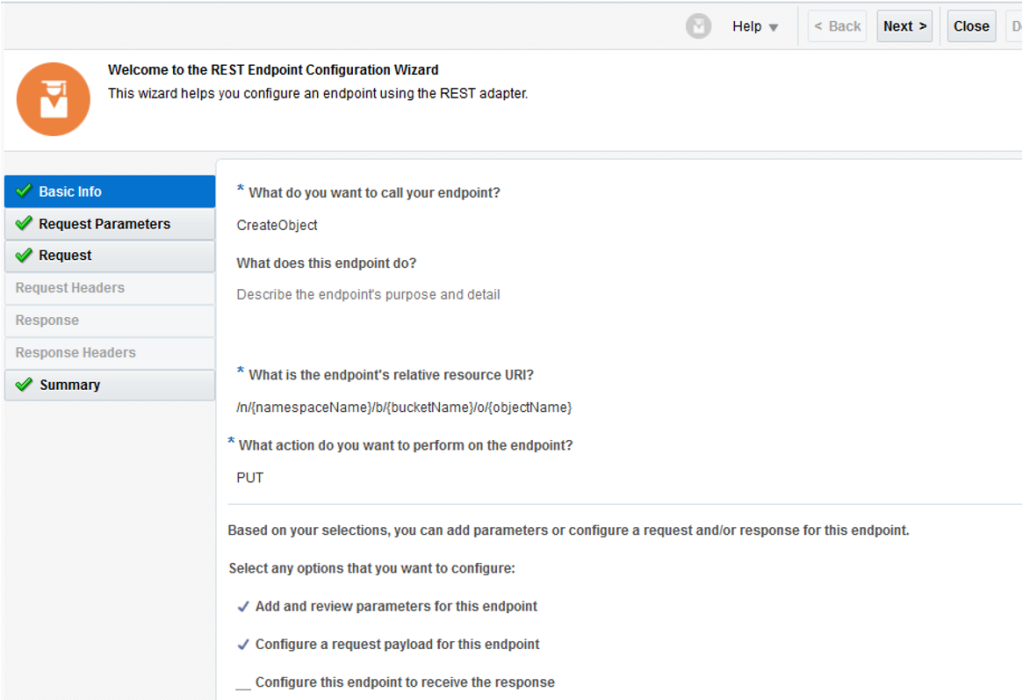
To configure the Object Storage REST connection I have:
- Specified the following template based URI:

/n/{namespaceName}/b/{bucketName}/o/{objectName}
You can find the namespace and bucket name associated with your target bucket through the OCI consoleand specified PUT as the method:
Configured a request payload where I have again defined the request payload as binary and the media type as application/octet-stream:
Finally at the end of my flow I am returning the file name and a successful status (if an error occurs at any point in the flow I am using global fault handling to catch it and pass a status of FAILED with the corresponding fault code and message):

So now that the flow is done and activated, let’s see it in action. I will be using Postman to test it.
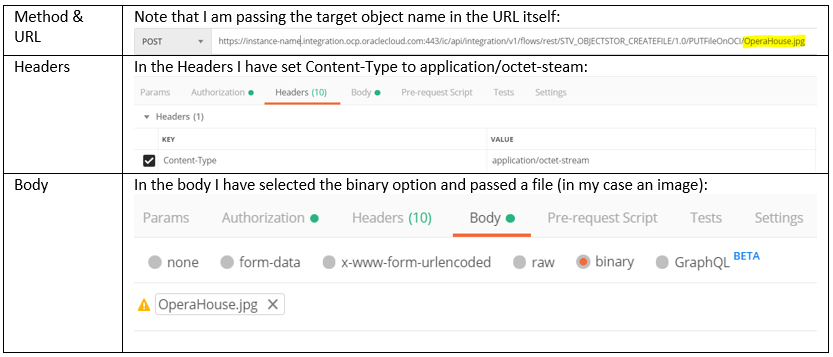
Triggering the flow we get a 200 response:

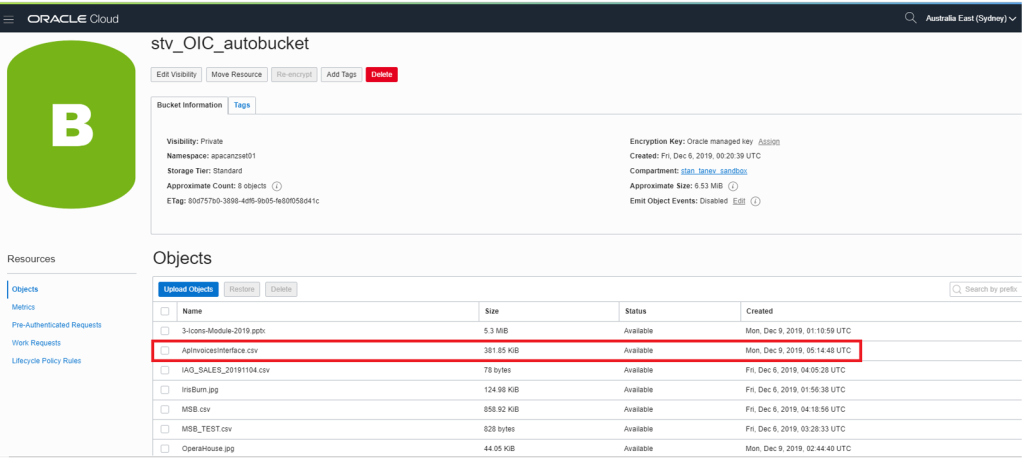
And if we have a look at OCI we can see that the image has been uploaded:

In the above example I have uploaded a picture of the Sydney Opera House but you can use this approach to upload any file that you like. A quick download of this image verifies that my file has been uploaded successfully:

Write Integration 2:
Use OIC to automatically push files from an FTP server to Object Storage. The below flow captures an OIC integration that will “forward” files from an FTP server to OCI Object Storage. Why would you want to do this? … well perhaps you have an archival requirement that would be better served by leveraging cheaper cloud-scale storage or maybe you want to use Object Storage as a File backup repository.
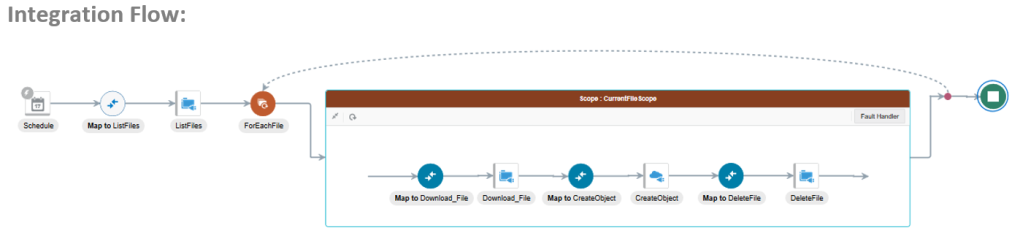
In this integration, I am listing all files that reside in a particular folder within an FTP server. The integration is a scheduled based orchestration that will run periodically checking for files to push to Object Storage.
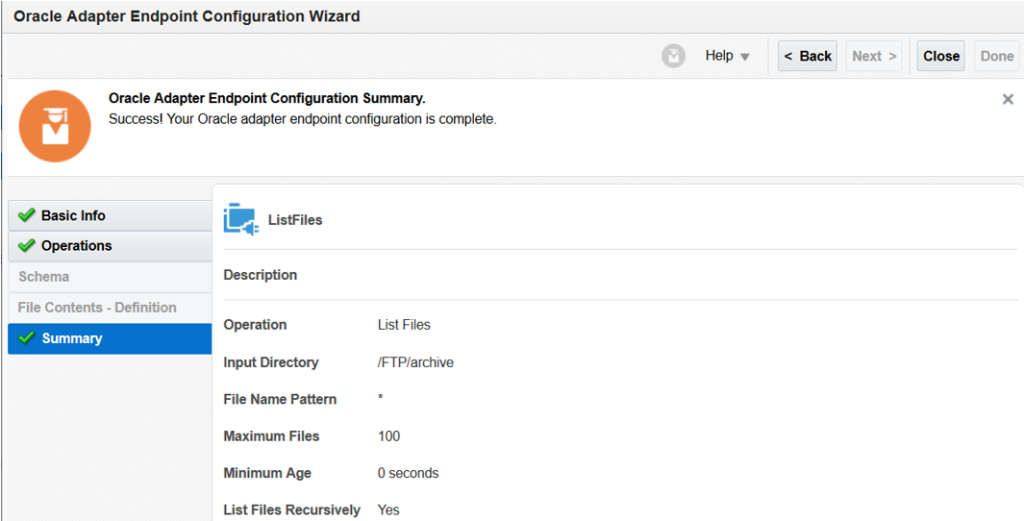
In the first step I am using the OIC FTP adapter to look for all files in an archive folder of my file server. Note here I could look for files with a specific prefix or suffix however I have chosen not to as I want to be able to process all types of files with this integration:
Once I have listed all the files in the archive folder, I need to loop through each one of them and take the following actions:
- Download the file to OIC (this allows me to process files of larger size)
- Trigger the OCI Object Storage API to upload each file to OCI
- Delete the file from the archive location on the FTP server (as we have already backed it up to the cloud)
Note that I am using a scope element within the for-each loop, that allows me to take specific action for each file in case of an error. Normally I would define a customized alert here, highlighting the specific file that has failed to move with an associated error message. I would also move the file to a dedicated folder on the FTP server to isolate it from any future runs.
In the Download File step I simply map the current file (being iterated through the loop) to the download operation.
Note the download operation cannot handle wild cards in the file name, so here we leverage the output of the list file command to specify each file name:

Next, OIC gives us the ability to grab the file reference from the output of the Download File operation and map it to the Stream Reference required by the OCI Object Storage API.

Note: don’t forget to map the namespace and bucket as these parameters are required.
The REST adapter is the same in configuration as in the previous integration so I am not showing the details here. The important point to high-light is that you can map the contents of a download operation to the OCI Object Storage PutObject API.
Once the file has been successfully uploaded to OCI Object Storage, I use the FTP Adapter to delete it from the archive location on the FTP server. In this mapper I simply map the current file name to the delete operation.
Again I have activated my integration and am ready to test. I have placed a file in the archive directory of my FTP server and submitted my OIC integration:

The OIC job has completed successfully

And the file has been deleted from the archive location

And moved to OCI object storage
In the above integration scenarios we have simply mapped a file/stream reference from a source connection to the Object Storage PutObject API, but what if some transformation needs to take place in between? How can we map the payload to the Object Storage API in this case?
Well, all we need to do here, is leverage the StageFile operation within OIC. By adding a Stage File Write step in our flow we can write any payload to a temporarily file within OIC. In the Stage File Write operation we will need to define a schema that captures the format of the target file. The auto generated mapper component can now be used to map any data from your source payload to your target stage file schema and perform any necessary transformation. Now the output of the StageFile operation can be used to map the file reference (of the transformed payload) to the Object Storage API:

The overall sequence of the above steps might look like:

I have not captured these steps in detail but I hope the above gives you an idea of how to handle any file transformation requirements before writing to Object Storage.
Now that we have discussed how to write files to OCI Object Storage with Oracle Integration Cloud, I believe that we should also quickly address the ability to enforce an archival policy on these files. Implementing an archival process on files at rest, is a common request and is really easy to achieve with OCI Object Storage as it comes with easy to configure lifecycle policies. These policies let you archive or delete files based on the age of the file and its associated pattern. This means that we can quickly setup an archival policy on objects that exist in a certain bucket, begin with a certain prefix or have a given pattern or extension such as .csv.

For more information on OCI Object Storage life-cycle management please click here.
In this blog we focused on connecting Oracle Integration Cloud with OCI Object Storage and using it to write files to Oracle Cloud Infrastructure buckets. In the next blog of this series I will demonstrate how we can use OIC to list, read and delete objects from OCI Object Storage whilst sending transformed files to Oracle ERP Cloud.
Thank you for reading … until next time

So when you described writing the first integration you went into great detail on the 3rd widget, CreateObject, but the first widget/step UploadFileRequest, does not have a lot of information, its probably relatively easy, can you briefly describe how to set up that first REST connection or point me in the right direction?
LikeLike
Hi Brian, it’s a good question. The first UploadFileRequest was a normal REST API (exposed out of Oracle Integration Cloud). The purpose of this function was to invoke the “flow”. The purpose of the instructions and blog was focused on the object storage (bucket) hence not much detail on the UploadFileRequest. You can find out more about the REST API connection and triggering here – https://docs.oracle.com/en/cloud/paas/integration-cloud/rest-adapter/add-rest-adapter-trigger-connection.html#GUID-65AFE39B-5083-44D3-B08A-F478009C518A. That being said, the same and the entry point could easily be a different adapter or a scheduled trigger (like a timer).
LikeLike