
Customization is essential part of any SaaS implementation to capture unique business needs. In NetSuite SaaS application also, there could be several use-cases where user might need to create a new Custom Object or add custom fields into existing Standard Object such as Contact, Account and Organization etc. In this blog I will be showing how can we add Custom fields e.g. Degree name and Passing Year etc. into existing NetSuite Contact object and can update the same field using Oracle Integration Cloud (OIC) NetSuite adapter.
Please Note: NetSuite Adapter handles the Custom fields in very different way in compare to other adapters. Due to NetSuite API limitation, OIC Adapters not able to discovers Custom fields created in NetSuite which could be concern to many Customers. However, Oracle NetSuite Integration Adapter provide a way to specify manually all those Custom fields using InternalId and ScriptId and assign associated values coming from Source System to those fields and that’s the core objective of writing this blog to show to reader how we can manually add and assign values to NetSuite Custom fields using OIC NetSuite Adapter.
The use case scenarios –
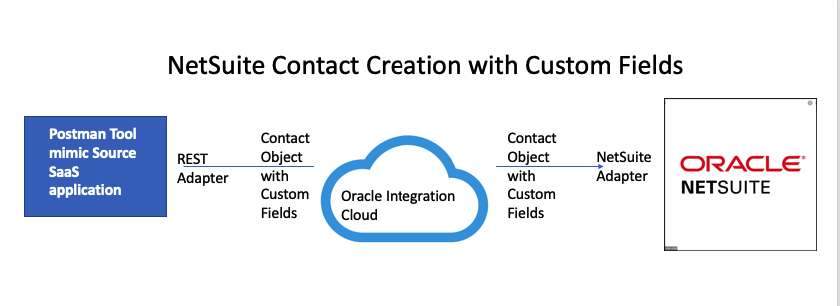
Below are the high level steps user need to perform to achieve outcome.
- NetSuite – Create Custom Entity fields in NetSuite for Contact object
- OIC – Create NetSuite Adapter connection as Target System
- OIC – Create REST Connection as Source System
- OIC- Workout Request Response Payload for REST Adapter Input
- OIC – Create Integration, do mapping and Activate Integration
- OIC – Test Integration using POSTMAN
- NetSuite – Verify Contact object details
NetSuite – Create Custom Entity fields in NetSuite for Contact object
To simplfied this example we will just creating two Custom fields 1) DegreeName 2) Passingyear
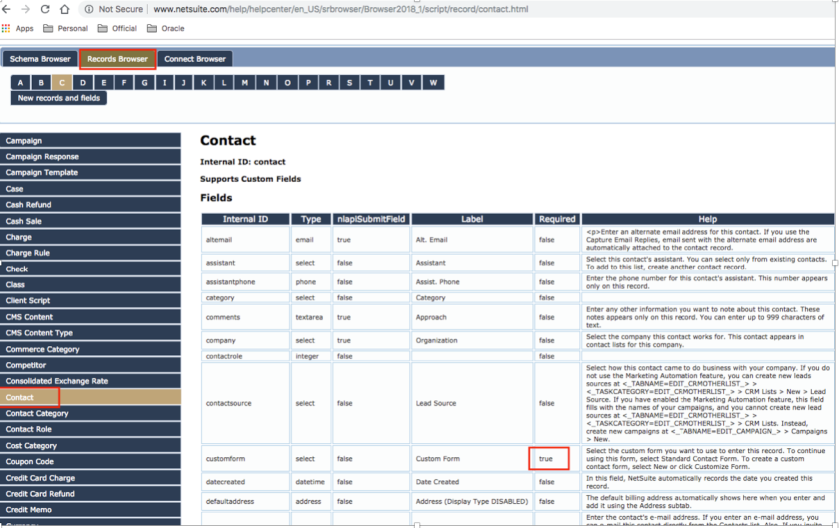
In order to create Custom Fields in NetSuite, navigate to Customization >> Lists, Records and Fields >> Entity Fields >>New >> Specify New Entity Field Name e.g. Degree Name and other parameter as per below snap.
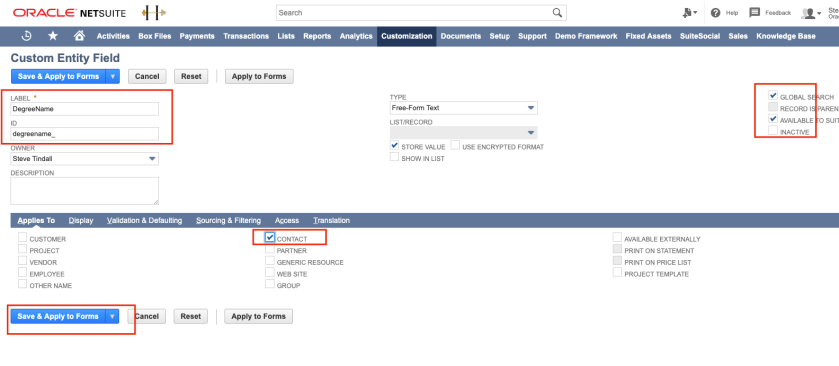
Similarly, creating another Custom fields “passingyear”.
In order to verify newly Created Entity Field for Contact object, Navigate to Contact >> Custom and you will see two newly created field visible there.

Once you create Custom Field, make sure you capture the “InternaId” and “ScriptId” of those fields as we need them while mapping REST Input to NetSuite Contact Object elements.
However, seeing “IntenralId” and “ScriptId” might not be enable for your NetSuite environment. In order to see those column, two configuration needs to be enabled inside NetSuite.
Login to NetSuite >> Setup >> Company >> Enable Features >> Find out “Client SuiteScript” and enable this item.

Navigate to Home >> Set Preferences >> General >> Enable “Show Internal Ids”

Once above changes are done. Navigate to Customization >> List, Records and Fields>> Entity Fields >> Find out newly created Entity Fields e.g. Degree name and Passing year >> ID column represent “Script ID” and Internal ID is InternalID of that Entity field. Note down those values as we need them during mapping time.

OIC – Create NetSuite Adapter connection as Target System
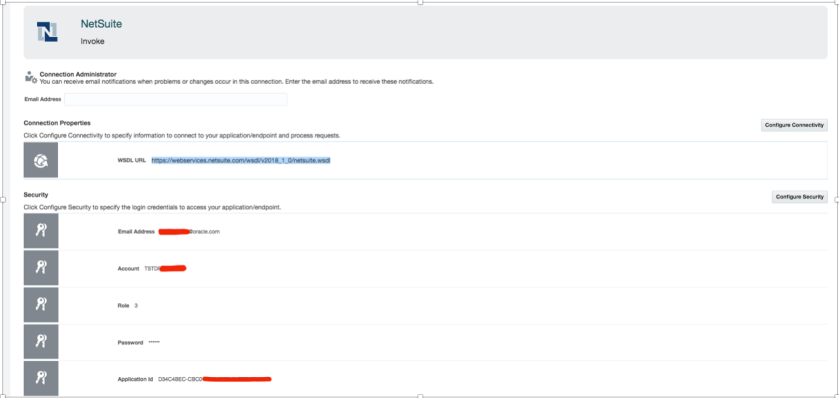
Login to OIC >> Integration >> Connection >> Create >> Search “NetSuite” adapter >> Select >> Specify some meaningful name for adapter >> ROLE=Invoke >> click on create option.
Note: by the time of writing this document NetSuite adapter doesn’t show Trigger role because NetSuite System as such doesn’t offer any way to raise event and publish event to external system. If you want NetSuite to trigger something then use OIC generic REST Adatper and Write Custom Code inside NetSuite to trigger OIC REST Adatper Or Initiate a flow and use NetSuite Adapter GET operation to get Customer/Contact Definition etc.
NetSuite Adapter needs below inputs –
WSDL URL Sample Value –
https://webservices.netsuite.com/wsdl/v2018_1_0/netsuite.wsdl
Note: In above URL only highlighted version need to be changed for specific NetSuite Environment, rest of the URL stay as it is.
How to get this value –
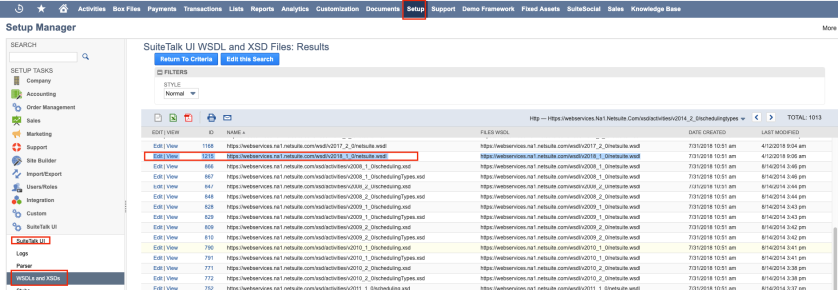
Login to NetSuite >>Setup >> SuiteTalk UI >> WSDL and XSD >> find out the latest version available for NetSuite WSDL here
Configure Security –
Under the configure security user has to provide quite few attributes values e.g.
Email Address: Enter the email address that serves as the user name.
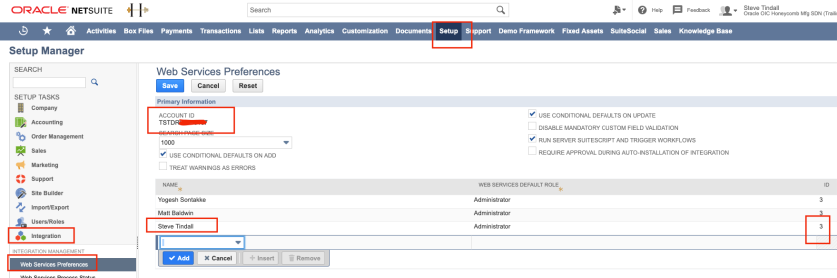
Account and Role : Enter the account and role code of the user which using to connect to NetSuite. To get the Account Name and role. Navigate to Setup>>Integration>>Web Service Preferences and get the Account ID from Top and role code from bottom right corner, refer below snap –
Password & Confirm Password: Enter the password and confirm the password.
Application Id: Enter the application ID received from NetSuite. This is a mandatory field starting with the 2015_02 version of the NetSuite WSDL. To get this info from NetSuite, navigate to >> Setup >> Integration >> Manage Integration >> Either create new application code or take any existing one from here which been created for OIC

Test Connection:

All good, NetSuite connectivity from OIC been sorted now, let move to next step.
OIC – Create REST Connection as Source System
Creating rest connection is fairly easy in OIC. Navigate to OIC Home >> Integration >> Connection >> Rest Adapter >> define rest connection name
Specify your OIC Environment base URL as Connection URL and select basis Authentication.

Save and test connection. Till now NetSuite Adapter (Target) Connection and REST Adapter (Source) connection been created.
Next, steps to workout input and output payload for Contact object.
OIC- Workout Request Response Payload for REST Adapter Input
In order to create contact using NetSuite API, the important things to work out mandatory parameters because until we supply required mandatory parameter, integration will be keep failing.
In order to do that, refer the NetSuite Schema Brower Online –
http://www.netsuite.com/help/helpcenter/en_US/srbrowser/Browser2018_1/schema/record/account.html
Find out Business object e.g. Contact and see what the field are are mandatory fields under record browser
Once all the mandatory values workout then designs the JSON payload for request and response which we will be passing to NetSuite Contact creation request and will get response as well.
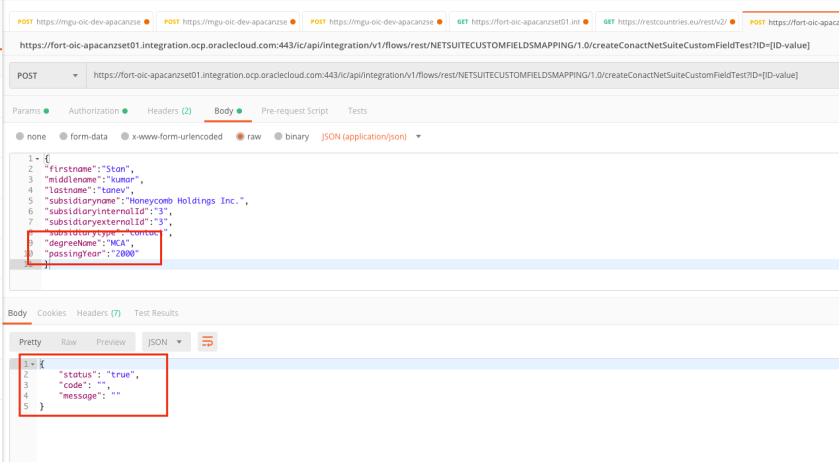
Request Payload
e.g.
{
"firstname":"Stan",
"middlename":"kumar",
"lastname":"tanev",
"subsidiaryname":"Honeycomb Holdings Inc.",
"subsidiaryinternalId":"3",
"subsidiaryexternalId":"3",
"subsidiarytype":"contact",
"degreeName":"MCA",
"passingYear":"2000"
}
Response payload
{
"status": "true",
"code": "",
"message": ""
}
OIC – Create Integration, do mapping and Activate Integration
Login to OIC Home >> Integration >> Designer >> Integration >> Click Create >> Select “App Driven Orchestration” >> Give an Integration name as per your choice and click create.
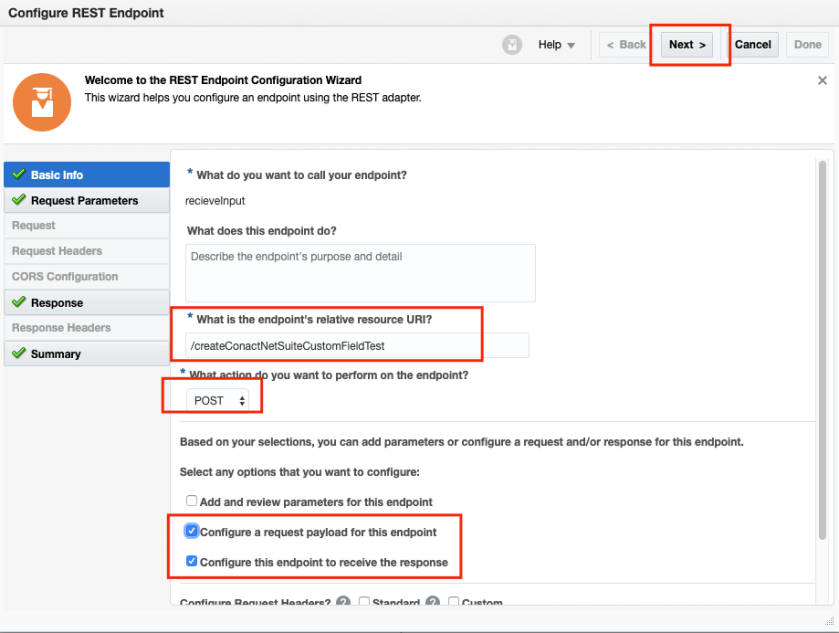
Drag and Drop Rest connection as starting point in blank canvas and configure the REST Adapter request, response parameters etc.

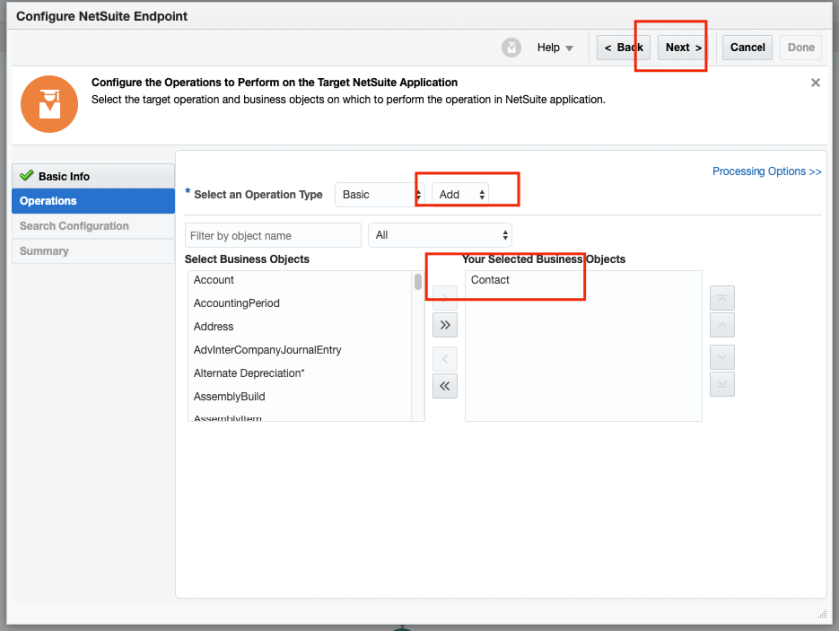
Once REST Adapter gets configured as starting point. Drag and drop NetSuite Adapter and configure for Add Contact Operation.
Perform mapping between REST JSON Input to NetSuite Contact Object for Custom Fields. This is critical and challenging steps in whole flow as The Oracle NetSuite Adapter does not currently discover and show the custom field directly for you to select. Therefore, you must specify scriptId and internalId for each custom field before mapping its value. To get bit details understanding how Custom Field mapping works refer this documentation
Based on the type of custom field invoked, in our case its String type, you can provide the details (internalId and scriptId) of the custom field being mapped and the value to map to that custom field. For example, DegreeName from the source schema is being mapped to a custom field defined by the internalId of 4624 and scriptId of “custentitydegreename_”
Please note: Use appropriate data type e.g. for String based Custom Field use “StringCustomFieldRef”, for Boolean use “BooleanCustomFieldRef” and so on.

Use the repeat element functionality in the mapper to map two or more fields of the same type (for example, Boolean).
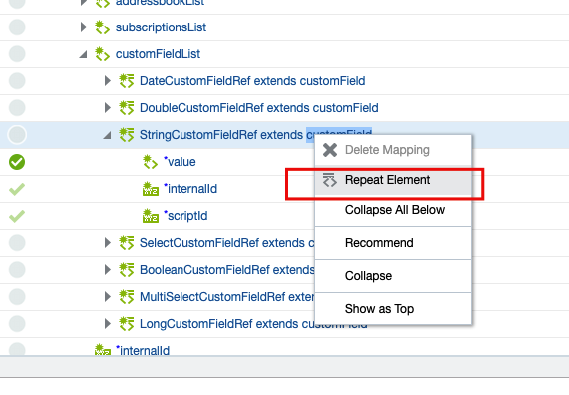
Once you click “Repeat Element”, another “StringCustomFieldRef” will be added and you can assign another Custom Field.

Map all others elements e.g. firstname and lastName etc and complete your mapping.
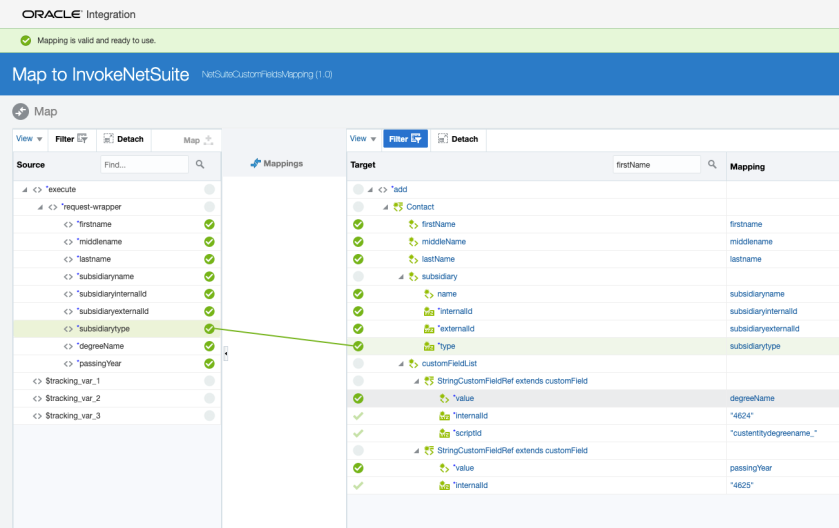
Similarly, map response from NetSuite to REST JSON, Save the mapping.
Your flow will look like this.
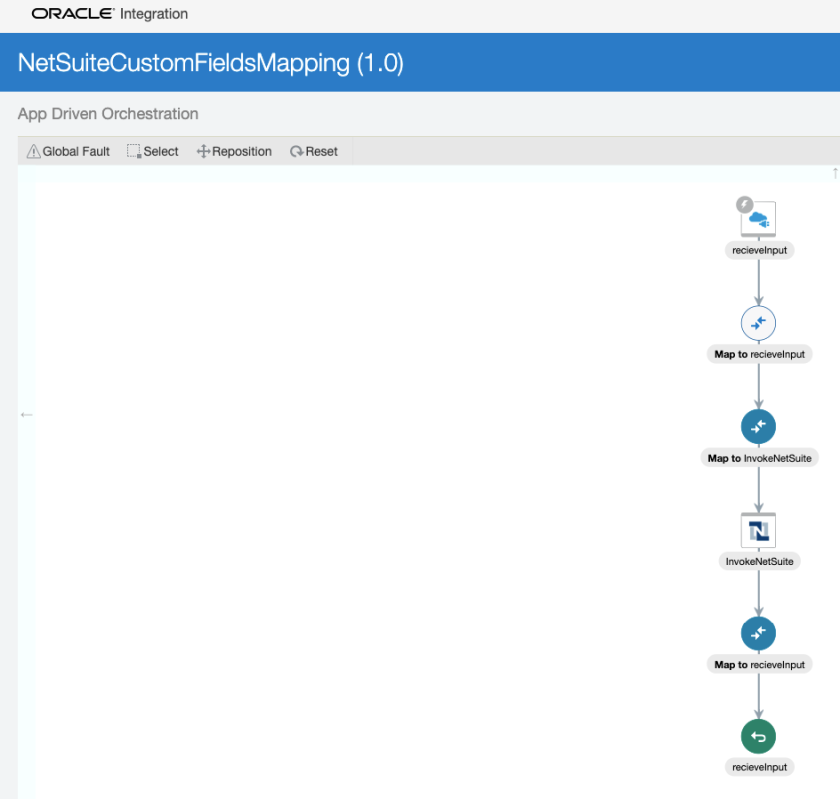
Add tracking field and activate the flow.
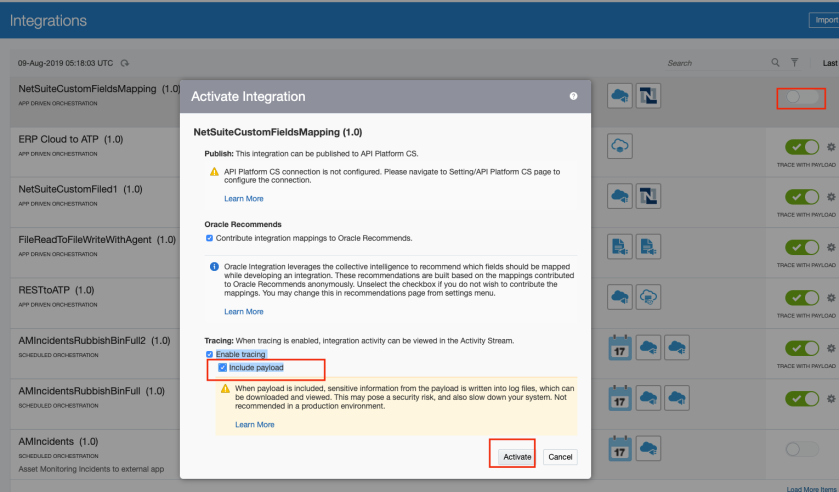
Once Integration activated, if will generate Integration URL which can be used inside postman to trigger the Integration flow with required input payload and authentication.
OIC – Test Integration using POSTMAN
Net-suite – Verify Contact object details

That’s it, as you can witness that the newly created Contact has newly created Custom Fields visible inside Netsuite.
I hope, this blog will help you to understand how easily and simply we can add new Custom Fields into NetSuite and can perform create Contact operation using Oracle Integration NetSuite Adapter.
So, stay tuned for more useful blog!!!
Happy Blogging 🙂

I was a bit lost today when I was writing. But after this article I am felling more confident with the work I have done until now.
LikeLike
Great post, both inspiring and discouraging at the same time, as what’s proposed is a tough act to follow. Yet, apparently one must
LikeLike
Thank you, author. This blog is so helpful to me. I was searching about this topic and bam, I found it. Very nicely explained by Screenshots though.
LikeLike