
We all know that data is massively valuable to businesses, whether it is to support daily business transactional activities (Online Transaction Processing – OLTP), or to help business with planning, problem solving and decision making (Online Analytical Processing – OLAP). Either way, businesses heavily rely on both ways to support their most important strategies and activities.
Until recently, companies had to heavily invest in provisioning, securing, patching and driving either way of Online Data processing mechanisms. In most cases, even with Cloud adoption, companies still had to rely on their own skills to make sure that their databases were properly patched, secured, tuned and managed.
However, today there is another option with the recent announcements that Oracle have made around Autonomous Databases for both OLAP and OLTP data processing. What this means, is that Oracle has taken automation to a totally new level with the assistance of Machine Learning. The idea is that the DB itself is self-sufficient with a full set of automated activities that range from patching, securing, optimising, etc. This will reduce not only the effort to run data workloads, but removing completely human errors, creating the opportunity to not only keep the lights on, but to focus on crucial business activities around innovation and differentiation.

Perhaps the best part of it, is that there is no learning curve to start utilising these Autonomous Database offerings. On the contrary, now there are less things to have to worry about. In this blog, I am showing how easily it is to provision an Autonomous Database for OLTP and quickly connect to it.
Previously, we wrote a similar article for Autonomous Data Warehouse for OLAP workloads. Feel free to also have a look at it as well.
Before we start
In this blog I assume the following:
- You have an Oracle Cloud account, if not request a free trial. Here: https://cloud.oracle.com/tryit
Ok then, let’s have fun!
Provision a new Oracle Database for OLTP workloads
- First login to your Cloud My Services dashboard. And locate Autonomous Database. If you cannot see it straightaway, you might need to “Customize Dashboard”.

- Click on the burger menu for Autonomous Database and then click on Open Service Console.

- On the Oracle Cloud Infrastructure console, click on the top left burger menu and click on “Autonomous Transaction Processing”.
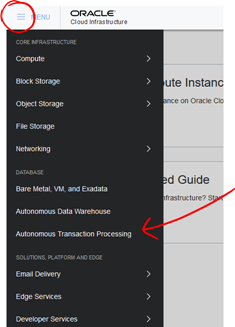
- Click on “Create Autonomous Transaction Processing” blue button.

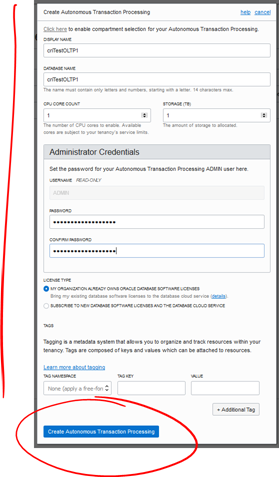
- Enter sensible values and when done, click at the bottom “Create Autonomous Transaction Processing”. Don’t worry about the size, you can always scale later if needed.
- The provisioning will commence.

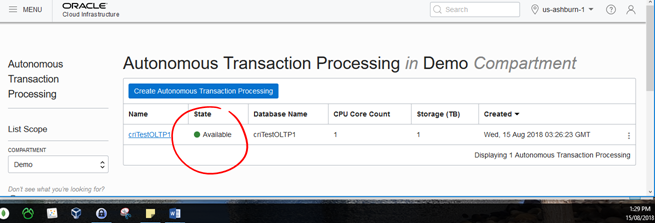
- Give it a few minutes. Once ready the states will change to “Available”. In my case it took less than 2 minutes.
-
Click on its name and feel free to browse around to get comfortable on the available tasks, which include:
-
Service Console (admin/[YOUR_ENTERED_PASSWORD])
- Storage
- CPU
- Activity / Current SQL statements
- Administration (download client credentials, Oracle instant client, etc.)
- Scale up/down
- Stopping/Terminating/Restoring
- Backups
- Etc.
-
-
Make sure to go inside the Service Console using admin/YOUR_ENTERED_PASSWORD and then under Administration download:
- Client Credentials (Security Wallet)
- Oracle Instant Client
- Client Credentials (Security Wallet)
We are going to need these, as soon as we try to connect to the DB from microservice or SQL clients, such as SQL Developer, as indicated in the following section.

Congratulations, your Oracle Autonomous DB is up and ready to be hammered by your business logic. Let’s not leave it waiting…
Connect into your new Oracle Database instance using SQL Developer
In order to connect to our new Autonomous DB instance, we are going to use SQL Developer. You can use whatever other software you prefer by adjusting the following instructions respectively.
- In SQL Developer, select New DB Connection.

-
Setup the configuration as follows:
- Username: admin
- Password: Enter the password that you used when provisioning the AUTONOMOUS DBC instance
- Connection Type: Cloud PDB
- Role: default
- Configuration File: Select the Wallet (zip file) that you downloaded previously
- Keystore Password: Select the wallet’s password that you entered when downloading your wallet.
- Service: Select a service you want to use.
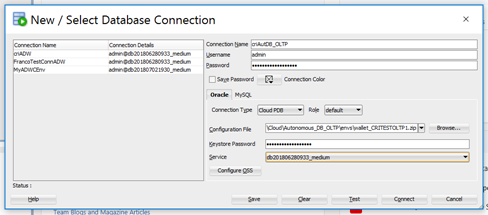
- Makes sure you get a successful Test.

- Save and then click Connect. You will find your connection on the left pane. Feel free to expand it.
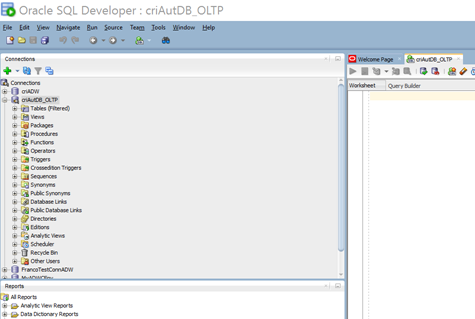
Congratulations!!! your AUTONOMOUS Database for Online Transaction Processing is ready to be used. At this point you can simply focus on using the DB, for your projects, without worrying on patching, securing and driving it.
I will keep publishing more advanced topics as I keep playing with the new generation of Oracle Autonomous Cloud Services. So, you better stay tuned!
I hope you found this blog useful. If you have any question or comment, feel free to contact me directly at https://www.linkedin.com/in/citurria/
Thanks for your time.

Good article Carlos, quite extraordinary that provisioning has improved to deliver services in 2 minutes.
LikeLike
Good article Carlos, provisioning in under 2 minutes is sensational progress
LikeLike
Good Article
LikeLike