
In this blog, I am going to show you how to integrate Salesforce and Sales Cloud with Oracle Integration Cloud Service (ICS). I am going to cover in detail how to configure ICS to subscribe for events to Salesforce and synchronise both SaaS applications without having to poll any of the endpoints. Salesforce is going to notify ICS when a specific event occurs, such as when Contacts who belong to a specific Account are added or edited.
This blog is a sequel of a previous blog, where I explain how to integrate Sales Cloud using ICS. If you haven’t reviewed it yet, I invite you to do so. Here is the link
Since this guide extends the Sales Cloud integration blog, I assume that you have created a simple CRUD set of REST APIs that interact with Sales Cloud Contacts. We will simply reuse these REST APIs to integrate into Sales Cloud. However, instead of the REST enabled API to CRUD Contacts into Sales Cloud, we could have decided to use an ICS “Invoke-based” Sales Cloud connector and achieve the same.
Pre-requisites
- This blog assumes that you have reviewed the blog that shows how to integrate Sales Cloud with ICS. Here is the link
- This is the Link to the official Oracle documentation that explains how to configure the ICS Salesforce connector.
-
For this demo, you will need an account for the following systems:
- Salesforce
- Oracle Sales Cloud
- Oracle Integration Cloud Service (ICS) account. You can request a trial here: http://cloud.oracle.com/tryit
-
For the Salesforce integration, we will need the Salesforce Enterprise WSDL. If you still don’t have it, perform the following steps to generate and retrieve it:
- Go to http://login.salesforce.com?lt=de
- Enter username and Password
- Expand Develop>API
- Select Generate Enterprise WSDL
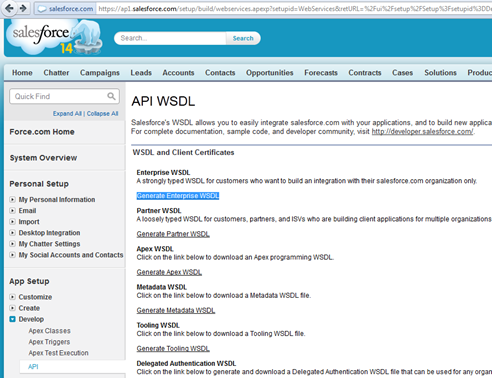
- Save the WSDL into your integration folder
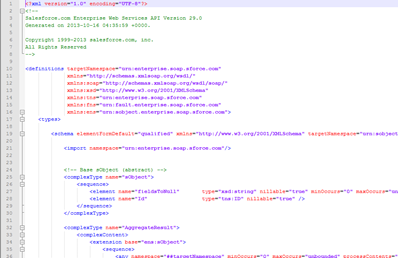
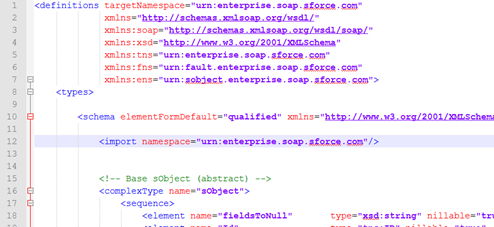
- Remove the first line and comment in the WSDL, so that it starts at the <definitions element. It should start like this:
If necessary, you can find more information at http://www.salesforce.com/us/developer/docs/api/index.htm
Creating the Salesforce Adapter Outbound Messaging WSDL
We will create an outbound messaging WSDL for the Salesforce Adapter. Then, we will select this WSDL when configuring the Salesforce Adapter as a trigger in the Outbound Messaging page of the Adapter Endpoint Configuration Wizard.
This process consists of several steps:
-
The outbound message consists of a workflow, approval or milestone action that generates an outbound invocation to the specified endpoint, in this case our ICS Salesforce trigger connector.
To create a workflow rule:
- Log in to your Salesforce account and go to Setup.

- Under the “App Setup” menu, expand “Create”, followed by “Workflow & Approvals”.
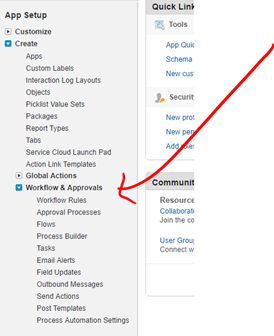
-
Select “Workflow Rules” as we want to automate the field updates for this demo.
- If you get the splash page, click Continue.
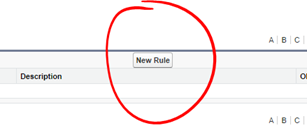
- Click “New Rule”
- Select the object that you want to focus on. In this case, “Contact” as the object. Then click Next.

-
Provide a good name and description.

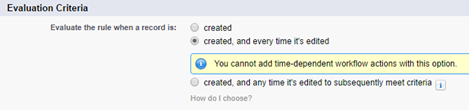
- For Evaluation Criteria, select to evaluate the rule when a contact is created or edited
-
For Rule Criteria, select when the following “criteria are met”.
-
Now, we want to sync all contacts that created or edited, who belong to a particular Account. In this case the account name that we want to focus on is called “S2V Exec Hospital“, in accordance with this previous blog, where we interact with Contacts in Oracle Sales Cloud.
So, we are going to create a rule criteria that checks when Contacts:Account Name “equals” S2V Exec Hospital – Which is the name of the Account that we are going to use to create our contacts under Salesforce.
-

Notice that you could potentially create more complex rule or formula evaluated criteria
- Your Contact Workflow rule looks like this. Click Save and Next to continue.

- We don’t have to enter any time-dependant filter, as we want to evaluate our rule every time a contact is created or edited. Simply click Done.

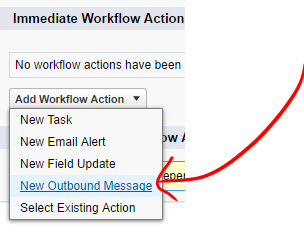
- Click on Edit to add a new Outbound Message.
- Click on “Add Workflow Action” and select “New Outbound Message”.
- Enter name and description. For Endpoint URL, enter a dummy URL for now.
- Select the fields that you want Salesforce to send to ICS. In this case, we need the Full Name, Title, Mobile and Email – As these are the fields that are required by Oracle Sales Cloud to send create a new Contact.

- Click Save.
- Then click Done. The new outbound message will show up associated to this Workflow Task

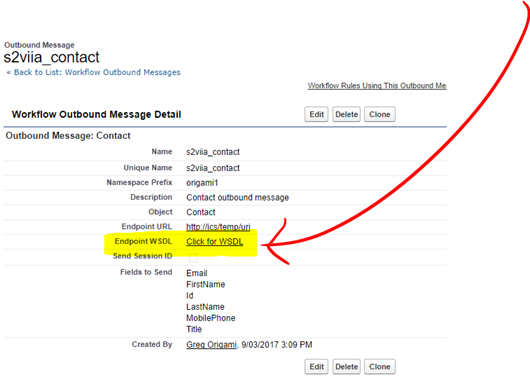
- Click on the Outbound Message Description link again and then “Click for WSDL” in order to generate the WSDL. Save it locally.
Configuring Salesforce Trigger connector in ICS
The Salesforce Connector in ICS can send data (Invoke), as well as receive events from Salesforce (Trigger).
The following are some common use cases:
- Account and contact synchronization between Salesforce and ERP (such as Sales Cloud, Oracle E-Business Suite, Netsuite, etc.).
- Opportunity to order synchronization between Salesforce and ERP systems.
- Employee on-boarding from HCM systems to Salesforce.com.
In this example, we are going to use the Salesforce Connector to provide a trigger-based messaging support, via the use of Salesforce Outbound Messaging WSDL.
However, the ICS Salesforce connector, also provides the following benefits:
- Integrates easily with the Salesforce application’s WSDL file to produce a simplified, integration-centric WSDL.
- Contacts the Salesforce application to fetch metadata information about business objects.
- Provides invoke (target) support for performing the following type of operations against business objects fetched from the Salesforce application:
- CRUD (create, get, update, and destroy) operations
- Salesforce Object Query Language (SOQL) or Salesforce Object Search Language (SOSL) query operations
- Provides invoke (outbound) support for using a custom WSDL that includes custom Apex classes exposed as SOAP web services.
- Provides trigger (source) callback support.
-
Provides metadata caching support. For information, see Refreshing Integration Metadata.
The very first thing that we have to do when using ICS is to create the connector(s) that are going to be used to integrate to the target applications. In this case, given we are extending the previous Sales Cloud exercise, we need to use an “Invoke-based” REST connector, that will allow us to call our ICS Sales Cloud CRUD APIs. The second connector will be a “Trigger-based” Salesforce connector that is going to allow us to subscribe for events to Salesforce.
Let’s create the “Trigger-based” Salesforce Cloud Connector:
- Login to ICS
- Click on Connections

- Click on New Connection and then select Oracle Sales Cloud.

-
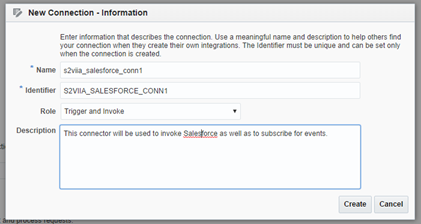
Enter a sensible Name and Description. Also, select “Trigger” for Connection Role. This means that you can use this connector to “subscribe for events” in Salesforce, so that your ICS integration get notified when “an Event happens” – In this case the event is when a new Contact is created or edited.
Note: You can alternatively select both Trigger and Invoke if you want to utilise the same connector for both purposes: Invoke Salesforce and Subscribe for events.
-
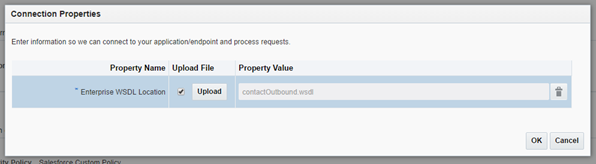
Click on Configure Connectivity and upload the “Enterprise WSDL”
that we generated previously.
STOP: Check again and make sure that you are importing the “Enterprise WSDL” that you generated during the pre-requisites of this blog and not the Contact Outbound Messaging WSDL that we just generated in the last step.
- Then click on “Configure Security”

- Enter your Salesforce user and “the concatenation of your password and the security token”

For example: If your password is mypassword, and your security token is XXXXXXXXXX, then you must enter mypasswordXXXXXXXXXX
Note: If you don’t have your Security Token or you have forgotten what it was, an easy way to reset it is by logging into Salesforce and at the top navigation bar go to your name > Setup > Personal Setup > My Personal Information > Reset My Security Token.
-
Then click OK.
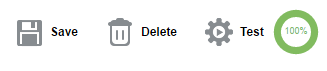
- Click on Save and Test. Make sure you get a green 100% completion – That means that your connection configuration is correct and ready to use.
- Now you can Save and Exit the connection.
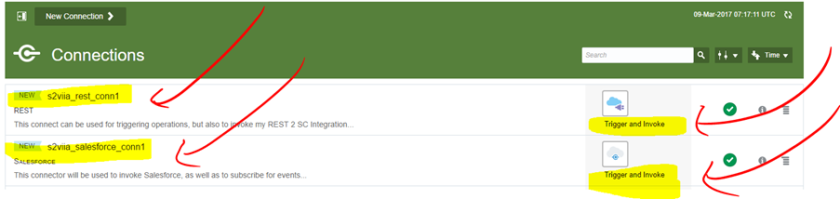
- Your New Salesforce connector will be shown:

-
Now, create an “Invoke-based” REST connector to invoke your set of ICS Sales Cloud CRUD APIs, as per the pre-requisites.
-
STOP: Before proceeding, make sure that you:
- Have built the Sales Cloud Integration that allows to create new Contacts in Sales Cloud. It should at 100% (review this blog)
- Make sure that you build a new “Invoke” REST ICS connector that points to the ICS Sales Cloud CRUD APIs.
Creating the Integration that subscribe for events in Salesforce and integrates then to Sales Cloud
Now, it is time to build the ICS Integration that is going to use the ICS Trigger-based Salesforce connector as an inbound connector, so that at the moment that a Contact is created or Edited in Salesforce, ICS will be notified (by Salesforce itself) and it will subsequently merge that change up to Sales Cloud, so that Contacts are in sync across Salesforce and Sales Cloud.
- Log into ICS if not already there
- Go to Integrations.
- Click on “New Integration”

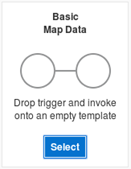
- For now, let’s just create a simple mapping. Select “Basic Map Data“
- Give it a good name and description. Then click “Create“

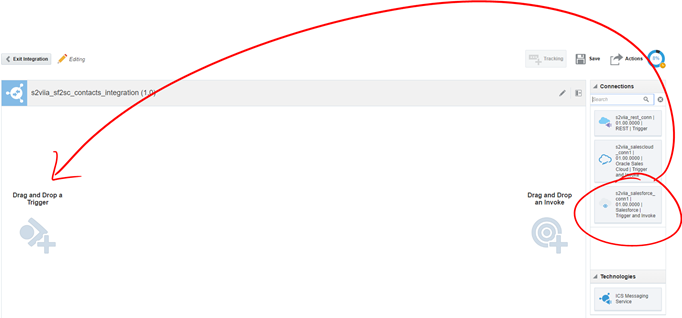
- You will get a clean integration.

- On the catalogue of connections, find the Trigger-based Salesforce connector that you built and drag and drop it into the left side of the integration canvas (i.e. the trigger or inbound section)
- It will open the Salesforce connector configuration wizard.
- Enter the name and description of the endpoint and then click Next.

- This is where we are going to use the Contact Outbound Message WSDL that we generated previously. Click on Choose file to upload it. Then click Next.

- Since we don’t want to send a response back to Salesforce, untick the option and click Next.

- Click Done.

- Your integration is halfway through.
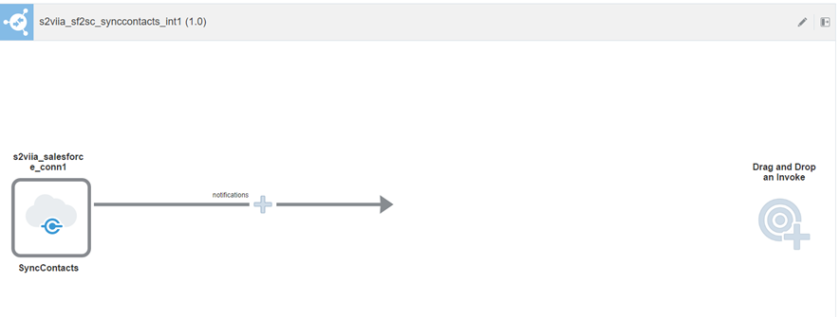
- Now, drag and drop the REST connector that “Invokes” the Sales Cloud Integration that UPSERTs Contacts into Sales Cloud.
-
Configure the REST invocation as per your Sales Cloud URI.
It should look like this:

- Then click Next.
- Assuming that you used JSON for your Sales Cloud API, click the sample JSON <> link.
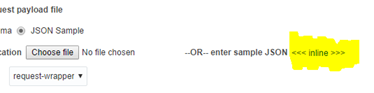
- Enter your sample JSON that will be used to create the tree structure for the mapping:

- Click Ok to save the sample JSON and then click Next.
- Review and click Done to complete.
-
The integration is almost complete, we just need to complete the mappings.
Notice that we could have configured a response as part of the Trigger-based Salesforce connector, so that we read the response from the REST invocation and then perhaps notify a 3rd party system for completion. For simplicity reasons, we are just triggering the synchronisation and forgetting about it. In real life, you would want to be a bit more resilient. This is out of the scope of this demo, but I encourage you to think about it and do it.

- The mapping is going to be quite easy, as we aligned the values that we are interested in Salesforce. However, we could have handle more complex transformations.

Notice that for now we are hardcoding the Sales Cloud Account ID. In a real project, you would do it differently. Perhaps by adding an enrichment sub task or using a Lookup Value Map to store the relationship between Account IDs in Salesforce and Sales Cloud.
- Make sure to Save your mapping before exiting.
- Add a good tracking field for monitoring purposes and Save the Integration. Make sure it is 100% completed.

- Now, activate your Integration and enable tracing.
- Copy its WSDL URL runtime location

- Now, extract the Service endpoint from this ICS WSDL. For this, you can copy and paste the WSDL location on a new browser window and copy it from the button of the document.

-
Go back to Salesforce and update the “dummy URL” that we setup when we built the Contact Outbound Messaging Service, with this new endpoint URL.
This is the idea:
When there is a new or edited Contact in Salesforce, who belongs to the Account “S2V Exec Hospital”, Salesforce is going to notify ICS by invoking this Endpoint URL.
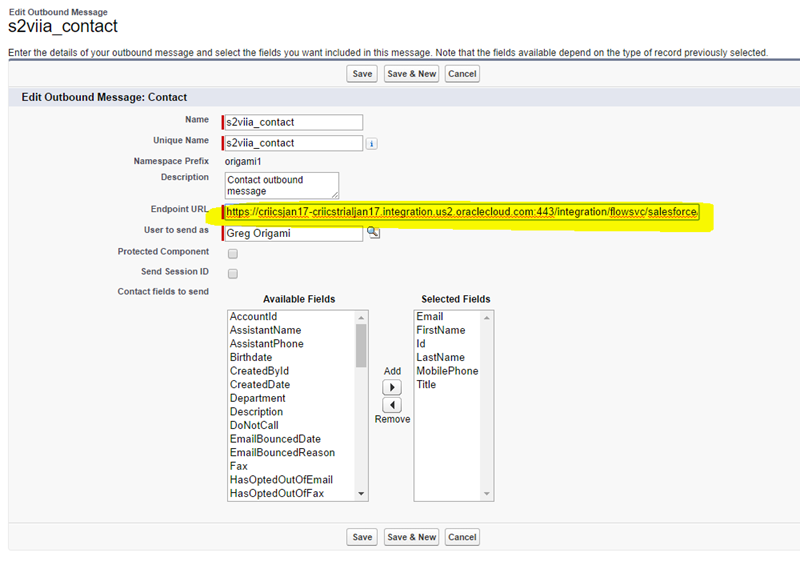
STOP: Make sure that you copied the Endpoint URL extracted from within the WSDL and NOT the WSDL URL itself!
- Do not forget to click Save.
- Now, let’s go back to the Workflow Rule that we built previously.
- Then click Activate.

- Make sure that the Workflow rule is Activated:

Let’s test the SaaS 2 SaaS integration
That’s it, it’s time to test our SaaS 2 SaaS integration.
- Let’s create a new Contact in Salesforce within Account “S2V Exec Demo” (create this account first if you haven’t done already).

- The user is created in Salesforce:

- The user is created in Sales Cloud:

- Validate in ICS that the integration flow worked as expected:


A couple of things you might want to try next:
- Handle the response from the REST API endpoint and determine what to do if it succeeds or fails. Perhaps send a notification to a monitoring system.
- Based on our configuration, Salesforce will notify when an existing Contact is edited, as well as created, but our ICS integration doesn’t handle the update yet. Try to modify it to properly handle it. For this you might have to modify the payloads and send the Contact ID and in Sales Cloud use an “UPSERT” (merge) operation.
- Replace the hardcoded Account ID from the ICS transformation and instead use a Lookup Value Map to handle the mapping between Salesforce and Sales Cloud Contact IDs.
Congratulations, we just built a very simple, yet powerful SaaS 2 SaaS integration from Salesforce to Oracle Sales Cloud without writing a single line of code, nor having to poll any of the Applications!!!
I hope you found this blog useful. If you have any comment or question, do not hesitate to drop me a comment or contact me via LinkedIn or any of the authors in solutionsanz.blog – We are here to help you!
Thanks for your time.

Hi Carlos. I think everyone should know such information like you have described on this post. Great info
LikeLike
Hi Carlos,
Good Day!
Can you please share integrating ICS with Oracle Fusion Cloud and a 3rd party file system(CSV file).
Thank you,
Vj
LikeLike
Thanks for this vital guidance
LikeLike
Reblogged this on Learning Newit.
LikeLike
Hi, please update the first link “Here there is the link” with the following one:
https://redthunder.blog/2017/03/10/teaching-how-to-integrate-salesforce-and-sales-cloud-with-oracle-integration-cloud-service/
LikeLike
Thanks great posst
LikeLike