
Creating an Application Server connection in JDeveloper to any SOACS environment is slightly different than doing it against a traditional WebLogic and SOA environment. The main difference is that the SOA CS environment is governed by Oracle Compute Cloud Service (IaaS), which by default establishes a few network restrictions.
There are multiple ways to open access from SOACS Compute Cloud Service to allow connectivity from JDeveloper, but in this document we have mentioned what we believe it is the easiest and less intrusive way. If this approach is not applicable to your situation, feel free to contact and discuss other ways with the owners of this document.
If you try to create an Application Server connection from JDev in the conventional way, most likely you will end up not being able to access the SOACS environment at all

In order to successfully gather access to SOACS, follow the next instructions:
Note: It is assumed that you have just created a new SOA CS environment with at least 2 Managed Servers. If your environment only has 1 VM (i.e. Admin server and Managed Server together), you can skip the section where it configures additional Managed Servers.
-
Login to your WebLogic Admin console.
For this, you will receive a public IP Address associated with the VM where your Admin server runs. The best way to get this IP Address is by:
- Logging into your “My Services” account
- Go to “SOA CS Console”.
- Then click on the environment that you want to connect to.
-
Then click on the top right burger icon and select “WebLogic Console”

Another way to get access to your WebLogic Admin console is by:
-
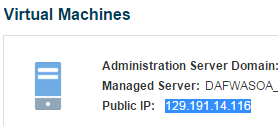
Once you are in the” SOA CS Console > Your target environment”, you will see the Public IP Address associated with the VM where the Admin server is running.
- Then simply go to https://[THE_IP]:7002/console
-
Make sure to bookmark this page for future easy access.
- Login with the WebLogic password that you configured when provisioned the environment.
- Go to Environments > Servers and notice all the servers that are provisioned, including the Admin Server and at least 1 Managed Server. In this case I have 2 Managed Servers, which is the typical topology for a high availability.

Note: A couple of things that you need to remember are:
- This environment is provisioned across 2 VMs
- The first VM has the Admin Server and the one Managed Server. This first VM is associated with a Public IP Address
- The second VM has the second Managed Server. This VM does not have a public IP Address.
You can validate the previous if you come back to your SOA CS console for your environment:

Now you have to think of a couple of things:
- JDeveloper needs a direct access to each of the Managed Servers at the moment of deploying a SOA Composite. This is because it gives the option to deploy to individual Managed Servers, assuming they are not working in a cluster (which they are by default and so any composite deployment to any MS will cascade any way).
- How can we give access to JDeveloper to all of the Managed Servers, if only the first one has a public IP Address?
The answer is via WebLogic Channels! Let’s configure one channel for each Managed Server without IP Address i.e. Internal Managed Servers in the next section.
Configure Channels for each internal Managed Server
- Log in to the WebLogic Admin console if not already there
- Click on the “Lock and Edit” button on the upper left corner

- Go to Environment > Servers and click on Admin Server

- Go to Configuration / General tab and remove the entry on Listen Address

Then click Save
- Go back to Environment > Servers and this time click on the first Managed Server (xxx_server_1), which is also associated with the first VM that has the external IP Address. You can also identify this server by ensuring that it belongs to the same “Machine” as the Admin Server.

- Ensure it does not have any entry on Listen Address either.

- Ensure that the tick for “Listen Port Enabled” – “8001” and “SSL Listen Port Enabled” – “8002” are selected, as by default.

- Expand the “Advanced” option at the bottom of the page and enter the external IP Address into the “External Listen Address” field

Then Click Save.
What we are doing here is configuring the default WebLogic access channel to externally listen on an IP Address, which is associated with the first VM, so there is no need to do anything else. If we had a Public IP Address associated to each of the Managed Servers in the cluster, we would need to do the same for each of the other managed Servers in the cluster. However since the first VM is the only one that has an external IP Address, now we have to configure a separate channel that will allow direct communication over t3 with the Admin Server.
- Go back to Environments > Servers. This time we are going to configure the Managed Severs that do not have an associated Public IP Address.

There are a couple of things that you need to think about:
-
The first thing that you have to notice is that by default every Managed Server is configured by default with a Channel listening on port 8001. Since all of them run on separate VMs, this is perfectly fine.
- When a SOACS or JCS environment is provisioned or when you scale out a JCS/SOACS environment, mainly two things happen:
-
Compute Cloud Service re-configures the network rules to grant access to all these different ports and servers, for example 8001, as well as network access among the different components in the environment, e.g. Load balancer to Managed Servers, Admin Server to Managed Servers, Managed Servers among themselves (as part of a single group), etc.
-
Load balancer (OTD) is configured with an access route to each of the Managed Servers in the cluster, so that it can properly balance the load among them.
-
We already established that since the internal Managed Servers don’t have an External IP Address, we need to configure a Channel. However if we specify a channel o a different port as the one already configured in the default channel (8001), we would need to manually go and re-configure Compute Cloud Service Networks and Load balancer (OTD) with the appropriate ports, routes, access, etc.
There is nothing wrong about it and it is really not hard, but if we use the same port (8001) for the new Channel in every new Managed Server and simply disable the default Channel, there is no need to modify anything at the network level, nor at the load balancer level.
If the above is not clear, feel free to contact the owners of this document for more information.
- Click on the Managed Server running on the private VM (in this case xxx_server_2)

Notice that, depending on the size of your WebLogic cluster, you will have to repeat these steps for each Managed Server running on a private VM (without an IP Address).
- Go to Configuration/General tab and ensure nothing is entered into Listen Address (by default it is blank)

- Un-tick the “Listen Port Enabled” option

This will ensure that this Managed Server will not listen through its default Channel
- Expand “Advanced” and ensure nothing is entered into “External Listen Address” –

- Click Save
- Then go to Protocols / Channels tab and click on the New Channel button.

- Enter a name ad leave protocol as t3. Then click Next

- Leave Listen Address empty and the default 8001 port for both Listen Port and External Listen Port. Finally enter the external IP Address associated to the public VM where Admin Server runs into the “External Listen Address” field

Then Click Next.
- Tick “Tunnelling Enabled”

Then click Next and Finish.
- Your new Channel will appear

- Finally click on “Activate Changes”

- Now you need to restart WebLogic. If it was just the Managed Servers, you would be able to do it from the WebLogic Admin console, but since we also made changes to the Admin Server, you need to restart the full cluster. If you attempt to do from the Admin console, you will lose immediate access to it as soon as it stops. A simple way to do is via the SOA CS Console.
- Log in to the SOA CS console > [Your environment] – If not already there.
- Click on Topology

- Click on the Admin Server burger icon and click Restart

- Once it restarts, you can restart the Managed Server(s) via the same approach, but given it restart not only WebLogic but the whole VM, it is easier if you go back to WebLogic Console (after it restarted) and within Environments > Servers > Control tab, simply select all the Managed servers and click Shutdown / When work completes (or force it if necessary)

And when they are shutdown, select them again and click Start
- Wait and ensure they restart correctly

We are done configuring WebLogic. The last step is to grant access to JDeveloper into the SOA CS Compute Cloud Network Firewall rules.
Granting Network Access to JDeveloper to SOA CS Compute Cloud
Once you have configured WebLogic, this is the last step to configure access to SOACS from JDeveloper.
If you attempt to create a JDeveloper connection now, you will realise that it is still unable to connect to the Admin Server

This is because the default Admin Server Channel runs on port 9001:

Port 9001 is not by default open in the Compute Cloud network firewall rules. Follow the next steps to grant access.
- Log in to “My Services ” – If not already there and go to Compute Cloud Service > Service console

- Click on Network

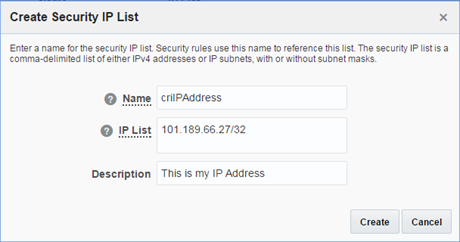
- Click on “Security IP Lists” and create a new Security IP List

- Give it a Name and Description. Then enter your external IP Address with a 32 mask – notice that you can append multiple IP ranges if separating by commas.
If you are behind a proxy or LAN, you can get your Public IP Address if you go to Google and search for “my ip address”

If you don’t have a browser or graphical interface, you can wget the following command:
wget http://ipinfo.io/ip -qO –
It should return something like: 101.189.66.27
- Your new Security IP List will appear

- Then click on Security Application and click on “Create Security Application” to describe the port 9001. Provide the following details:
- Name: Enter meaningful name, e.g. WLAdminChannel
- Port Type: TCP
- Port Range Start: 9000
- Port Range End: 9001
- Description: Enter meaningful description, e.g. This describes the default Admin Channel port

Then click Create
- Ensure you get a successful message

Also ensure you can see your Security Application port rage

- Finally put the Security IP List (your IP Address) and the Security Application (port 9001) together by creating a Security Rule. Click on Security Rule and click on Create Security Rule

-
Create the new security rule with the following information:
- Name: custMyDevRule (or whatever meaningful you want)
- Status: Enabled
- Security Application: WLAdminChannel –This is the Security Application that we created
- Source: Select Security IP List and select your IP entry i.e. criIPAddress
- Destination: Select DAFWASOAEnv-jcs/wls/ora_admin
- Description: This is my Dev access (or whatever meaningful you want)

Click Create.
- Ensure that you get a successful creation message.

And that your Security rule exists:

- Repeat the previous step to create another Security Rule, but this time to allow access on port 8001, which is the one used for the Managed Server channels.
Notice that the Security Application that describes port 8001 already exists, it was created by the Compute Cloud Service at the moment of the environment provisioning. It is called: XXXXX/ora_chttp
Your new Security Rule should look like this:

Click Create and also confirm that it was created successful.
That’s it. Your connection in JDev will work now and you can use it to deploy composites successfully!
-
In JDeveloper, if you haven’t done already, create a new Application Server connection with the following details:
- Connection Type: WebLogic 12.x
- WebLogic hostname: Your external IP Address
- Port: 9001
- SSL Port: 7002
-
WebLogic Domain: Enter your domain here

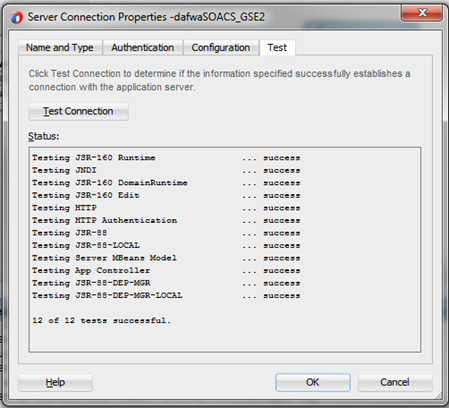
- Then click Test. You should get all successful connections.
Congratulations! You have successfully configured your development environment to allow deploying composites from JDev.
Search for the DevOps blog, we are going to show you how to deploy using DevCS as part of a continuous integration approach.

Hi Carlos, There’s been some GOOD changes to the network channel configuration that simplifies the network changes to enable external development tools like JDeveloper to deploy to JCS and SOA CS. Makes it simplier … I’ll blog this soon.
LikeLike